
Lesson Three: Aperture
Hey friends, welcome back to the DSLR Mini Lesson Series! I hope you enjoyed last week’s lesson about ISO and had time to get out and practice with your camera. If you happened to miss that lesson, or if you’re new here, I highly encourage you to start at the beginning of the lessons. Each lesson builds upon the last, so make sure you understand the previous lessons before diving into today’s topic. You can find the first two lessons at the link below!
Now let’s get started with today’s topic - Aperture!

aperture: what you need to know
Aperture is my favorite setting to play with! Do you ever wonder how some photographs have a blurred background or foreground (like the photographs above)? That’s because of the aperture setting! One of my favorite things to photograph when I first started learning about my camera was nature - flowers and plants specifically. I loved bringing focus to a certain area of the photograph and making the rest blurred. I still loving doing this! If you’ve ever wondered how to do this in your own photos, today you’ll learn.
*In the first lesson you should have found the aperture setting on your camera and figured out how to adjust it. If you haven’t yet done that, I suggest going back to lesson one and getting familiar with that first.

I will forewarn you, aperture can be one of the trickier settings to wrap your mind head around. Take your time going through this lesson and review it as much as possible until it starts to make a bit more sense. Trust me, the more you practice, the easier it will get!
First, let’s talk about what aperture actually is and how it works when you take a photograph.
Aperture is controlled by an opening in the lens through which light passes to enter the camera. Think of it like the pupil of an eye, the wider it is, the more light that comes in.
Aperture is measured in f-stops. The aperture settings are controlled by your lens, not your camera. Each lens will have a different rage of f-stop measurements.
You will hear the term “depth of field” being referred to with aperture settings. Depth of field refers to the amount of the photograph that is in focus versus the amount of the photograph that is out of focus (or blurred). Photos that have a main object in focus and the rest blurred are considered to have a “wide” depth of field, while photos that are mostly or all in focus are considered to have a “narrow” depth of field.

The lower the f-stop number…
The lower the f-stop number, the more light your lens is letting in the camera (see the image below)
The lower the f-stop number, the “larger” or “wider” the opening is (I know, it seems like it should be the opposite, but it’s not!)
That is because the lower your aperture setting the larger the opening is to let light in (see the image below)
The lower the aperture setting, the more blurred your foreground or background will be.
This is great for portrait and nature photography. It is also helpful when shooting in environments that do not offer very much light (indoors, night photography, etc).
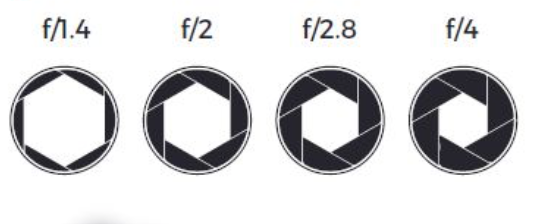
The higher the f-stop number… the less light your lens is letting into the camera (see the image below)
The higher the f-stop number, the less light your lens is letting into the camera which means the opening is smaller (see image below)
The higher the number, the more foreground and background will be in focus.
This is good for landscape photography and photos that have more than one subject (you want to make sure everyone is in focus)

Let’s take a look at a few photos that have different aperture settings, ranging large to small (or wide to narrow). Please excuse my subjects, my children wouldn’t sit still long enough for me to use them as examples. :) Pay attention to the aperture (f-stop setting) in each photo and notice how the background gets a little more in focus with each image. It’s easiest to recognize if you pay attention to the plants in the background of each photo.

f/2 - shallow depth of field - shooting “wide open”

f/8 - more of the background is in focus

f/16 - wide depth of field - even more of the background in focus
what to remember when shooting with a large aperture (aka, a low f-stop number in order to achieve a blurred foreground or background)
One of the main questions I get is how to get the background blurred in a photograph. It’s definitely a desired look and makes a photograph very pretty, especially when you’re wanting to focus on the details of a subject (such as a person, plants, etc). But there are some things you should keep in mind about focusing so that you are able to capture the photograph exactly how how you envision it. Watch the short video below to learn about choosing your own focal points when taking a photograph, and then I’ll help explain how to do that.
Now let’s have you do that yourself, on your camera:
Manually select your focal point to ensure the object you want in focus is actually in focus. When in automatic mode, your camera chooses what to focus on. You cannot choose your focal point in auto mode. Follow these steps if you want to have more control over your focal point:
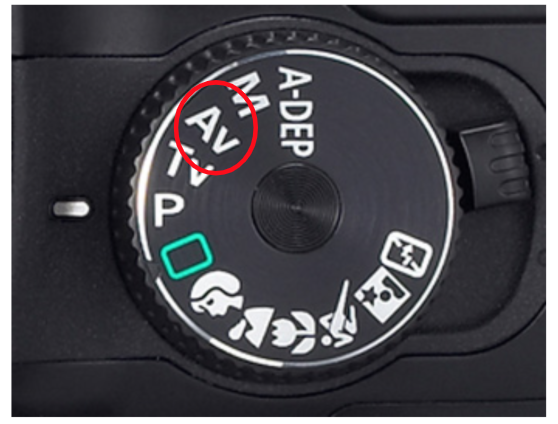
Make sure you’re in a creative mode on your camera: Program, Aperture Priority (AV), Shutter Priority (TV) or Manual mode
Choose your focal point by finding the button that looks like a grid (see photo below); if you do not see this button on your camera, you may need to refer to your manual or do a quick google search for how to find the focal point button on your specific make and model camera

Once you find/press that button, you will see a grid of point selections that you can choose from. Cameras differ in how to toggle between each point. You may need to turn your dial or use your up and down arrows to choose what focus point you’d like to use.
Once you choose your focal point, make sure that point is on the specific area of the photo you want in focus. If shooting a person, I usually try to focus on one of their eyes. Slightly press your shutter down and that area of the photo should come into focus. Take the photo!
Remember, your focal point will remain in that selection until you change it.
2. Another important thing to remember when you are shooting with a large or wide aperture (aka, a low aperture setting to get a blurred background or foreground) is that if you have more than one person in the photograph it may be hard to get them all in focus unless they are all right next to each other.
If one person is in front of the other, or if you have several people in a photograph placed at different distances from the camera, then your main focal point will be in focus but the objects in front of and/or behind that object may not be as in focus. Take the photo below, for example. The focal point in this image was on my daughter’s face. The background is blurred nicely. However, my face is also blurred because I was closer to the camera than she was. Since my aperture was large (the opening was open wide, f/1.8) and the focal point was on my daughter’s face, that means the foreground (me) wouldn’t be as in focus.

I love shooting wide open to achieve that smooth, blurred background. If I’m taking more candid photos, I usually don’t mind if not all of the people in the photo are in focus, as long as my main subject it. Since the focus is on my daughter in the photo above, I think it’s totally fine that I’m out of focus. This is totally personal preference. You may not feel the same, and that’s okay! However, if I had more people in the photo and they were looking and smiling at the camera (a more posed/tradtional photo), then I would definitely want everyone in focus. To do that, I would use a much smaller aperture (perhaps f/5 or greater, depending on how many people were in the photo).
Take a look at the two photographs below and pay attention to the difference the aperture settings made in each image:

f/2.5 - After a quick look at my camera after taking this photo I realized the kids in the back weren’t as in focus as I’d like, so I knew I needed to adjust my aperture. Can you tell who I was focused on? My son, the little guy in the middle. If my aperture setting were smaller (which actually means set at a larger f-stop number), more of the kids would be in focus

f/5 - In this photo I increased my aperture f-stop number. However, I had my focal point set on one of the kids in the back so a couple of the kids in the front still weren’t as in focus as I would have liked them to be. I should have set my aperture even smaller (f/8 or higher, perhaps)
*Think of it this way:
the lower the f-stop number, the less that will be in focus
the higher the f-stop number, the more that will be in focus
Trust me when I say, it takes a lot of trial and error and practice to find what you like when it comes to your aperture settings. I obviously still don’t get it right a lot of times! The great thing is, you can take your time and have fun learning what you like. These are YOUR photos and your art. Sometimes my favorite images are the imperfect, out of focus and blurry ones. All that matters is that you love what you’re capturing!
If you’d like to review the information we just went over (which I highly recommend doing many times) then you may want to watch the short video below. The video may get a bit confusing towards the end since we haven’t covered that information yet, so just focus primarily on the beginning of the video about aperture settings. Like I said in the last lesson, the more you expose yourself to the ins and outs of these settings the more and more you’ll understand them!
*homework time!
Trust me, I know this lesson was probably a bit overwhelming. Aperture was (and is) the hardest aspect of photography I’ve learned and am still figuring it out! But I have good news - there’s a shooting mode on your camera that will make it much easier for you to practice these aperture settings!
Last week you practiced your ISO settings by shooting in “Program” mode. This week, we are going to switch your shooting mode into AV mode (Aperture Priority). In this mode, you will set the ISO (which you learned how to do last week) and also your aperture (which you are learning to do this week). The camera will take care of the last setting (shutter speed). Yay!
Just a side note - I actually shot primarily in AV mode for several years before shooting fully in manual. This is a GREAT setting to use while learning about aperture. Once you get used to shooting in AV mode I highly encourage you to continue until you are fully confident and ready to learn more about manual mode. Baby steps, remember? :)
So here are your exact instructions for this week’s task:
Set your camera to AV mode (see the photo below)
2. Set your ISO - Ask yourself, what kind of lighting do I have? Is it bright? In the shade? Indoors? Set your ISO accordingly (refer to last week’s lesson if you need help with this).
3. Next, choose your subject. I would recommend practicing this outdoors so that your camera will have plenty of light to work with. Working with a still subject is a great way to begin practicing with aperture, as well. It can be very hard to focus if you’re trying to photograph an energetic child that doesn’t want to sit for very long! I would also suggest focusing only on one subject as you get the hang of adjusting the aperture settings.
4. Set your aperture as large as it will go (which means the lowest f-stop number possible for your specific lens - probably f/2, f/2.5, f/4, depending on your lens)
5. Snap a photo! (If you’d like to choose your focal point, follow the instructions given earlier in the lesson.)
6. Now lower your aperture (make it a larger f-stop number); take a photo and observe the difference
7. Continue lowering your aperture (making the f-stop number larger); you should notice that more of the foreground and background are in focus as you lower your aperture
8. If your image is too dark or out of focus, you can try two things: increasing your ISO or lowering your aperture f-stop number. Remember, each of those adjustments will let more light into your camera, so only try one before trying the other. Continue adjusting each until you are happy with the exposure of the photo (how bright it is).
When practicing in AV mode, ask yourself “Do I want the background blurred or in focus, and how much so?” Set your aperture accordingly. Remember, the lower your f-stop number is, the more foreground and background blur you will have. The higher the f-stop number, the more in focus all areas of your photo will be.
Continue to practice with different subjects, depth of fields, and f-stops!